How To Operate DonorChase
Welcome to DonorChase.
This article will show you your way around DonorChase.
DonorChase is designed to show a lot of information at a glance, to allow you to quickly understand the full profile of the donor. Whilst it may look confusing at first, it is arranged in a logical order and takes only a little time to get used to.
The Dashboard screen has a header bar, and below it a wide table. This table is split into two parts. Information is on the left and chasing data on the right.
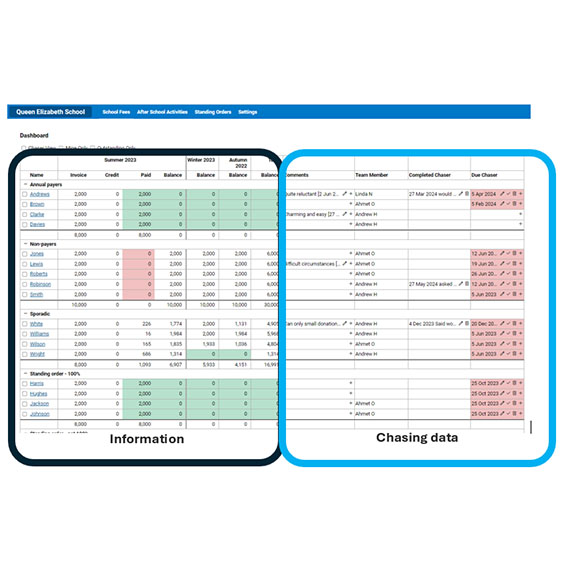
Let's look first at our information.
Information
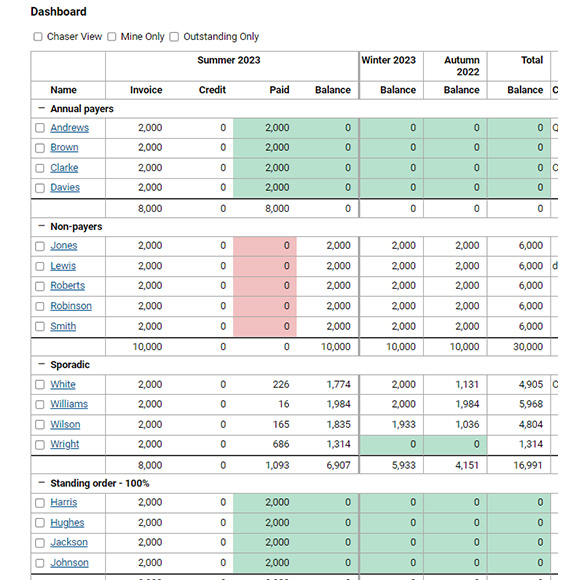
What are each one of these columns?
Each donor is listed in the left hand column. The names are underlined in blue, and are clickable to go through to the individual donor record.
In the next part of the table to the right, you will see 4 columns that relate to the most recent period (in this example, Summer 2023).
- Invoice – this is the amount of invoices that have been raised in your connected bookkeeping package for this period.
- Credit – if you give a discount, then record it as a credit note in the bookkeeping package and it will appear here.
- Paid – amounts paid for this period's invoices
- Balance – the balance outstanding for the current period.
The next column to the right gives the total amount to be chased for the previous period (Winter 2023).
The next column to the right gives the total amount to be chased for the period before that (Autumn 2022).
The final column gives the total amount to be chased for all time.
The length of a period is set manually – it can be a year for annual memberships, four months for school terms, or monthly for monthly subscriptions – it's entirely up to the charity to choose. Details of how to do this are in the initial setup article.
Why are the Donors split into different groups?
In our example, the donors have been split into four groups – Annual payers, Non-payers, Sporadic, and Standing order 100%. Part of the DonorChase methodology is to split your donors into categories that help you understand when to chase them. There may be reasons not to chase a Donor, and so they should be put in a ‘not to chase' category. Donors who donate via standing order shouldn't be asked why they have only donated part of the requested amount, and so they go into their own category. Donors who donate quickly can be reminded early in the period, and Donors who need constant chasing can go in a special category that will remind you.
Categories can be created easily and the names are up to each charity. Details of how to do this are in the initial setup article.

Chasing data
On the right side of the screen is the chasing information.
- Comments - this column gives some background information about the donor. Comments can be amended by clicking the pencil, and added to by pressing the + button. The full comment can be viewed by hovering over the box, or by clicking into the particular donor's record.
- Team Member – this shows who is responsible for this particular donor.
- Completed Chaser – shows detail on the last chasing attempt. Can be amended or added to.
- Due Chaser – shows the date when the next chaser is due, and allows you to change the date (pencil icon), complete the chaser (tick icon), delete the reminder (bin) or add an additional chasing date.
This cell will go red when a chaser is overdue, reminding you to chase your Donor!
Go to the next help page to see the individual donor page.
![]()
Contact Us
If you need any assistance with our charity bookkeeping software that is not on this help guide, get in touch with us via info@donorchase.com.
Navigation